Thursday, December 29, 2016

Why travel is so important. Oh and YES, you can do it on the cheap.

I have a severe case of Wanderlust...and there is only one cure.

Ever since I was a child I have enjoyed traveling. Going to new places. Going to places I have been before, but finding new hidden treasures. And going full out - WAY outta the way - in an Airstream trailer park in the South of France and sleeping in a jail in Switzerland to seeing the World's Largest Booming Prairie Chicken in Rothsay, Minnesota. Strange? Maybe. Totally awesome hell yes!

I realized I haven't talked much if any of our travels in this blog, so I thought it might be time to change that. Our norm when we travel is cheap and possibly a little wacky, but it has served us well over the past few years so maybe it is time I shared a few of our secrets and a few of our favorite places.
Mark and I have been together for several years now and we are both so glad we found a partner that adores travel as much as the other does! While I was working on getting my Masters Degree in the gorgeous Ithaca, NY and our first international travel was too....wait for it...Niagara Falls! Yep. I grew up in Ohio, but had never been. It is actually incredibly beautiful and if you have never been I suggest it be on your list. 
We mainly stayed on the Canadian side eh, but if you don't have an enhanced drivers license or a passport going to the American side would also allow you to spend some time with this incredible force of nature. We returned multiple times since that first visit and even went back to see the falls almost completely frozen in 2015 (yes it was freaking cold, but it was also an amazing sight to see!).
So for this first travel installment I will keep it short and share some gorgeous freezing cold pics from the frozen Niagara trip.
Travel is important to expand your horizons and your comfort zones. It helps you see the world and other cultures in ways you have never before thought. So go! Go see stuff near and far. Just go!
Lesson 1: You don't have to go far to be a tourist. There are amazing things close to home and are only a day trip away.  Just go!

What are some of your favorite travel tips???


Looking toward the falls from behind them on the Canadian side.

Even though it was sooooo cold the views were beautiful!

More looking at the water flowing toward the falls.

Artsy falls picture.

It was so cold the mist was frozen.


The falls on the American side are pretty close to being frozen.

The mist freezes on the lightposts and railing...

Even with all the water flowing the water at the bottom of the falls was pretty icy.


Yes. We were cold.


Cold and gorgeous!

One more pretty shot once the sun came out...

Tuesday, December 13, 2016

Something new for breakfast! Cinnamon sugar fried sweet potatoes!

The eternal question: What's for breakfast?
Something new!

I love breakfast. Always have, which is odd because I come from a long line of non breakfast eaters...what is wrong with them?

So in the quest to add something new to the rotation I decided to add sweet potatoes. Yep, for breakfast. But what was I going to do with them? Looking around the kitchen I get inspiration from the left over cinnamon sugar from the previous days Christmas Cookie extravaganza. Okay here goes nothing!

I had purchased some sweet potatoes at Trader Joe's and had yet to use these little beauties so I grabbed two (they were on the smallish side - not the monster sized ones you get at some restaurants) and sliced them like I was going to fry regular potatoes.

I heated up one of my favorite cast iron skillets and tossed the sweet potatoes in. I cooked them until they turned a lovely golden brown (some might have gotten a bit overdone, but I am easily distracted), turning them often to make sure they cooked all the way through. My cast iron is well seasoned so I didn't add much oil, but I did toss in some Earth Balance Vegan Butter (If you haven't tried it, it is quite good) during the cooking. Yes, I am a veg head, but I am doing my best to incorporate more vegan meals into the rotation for personal and environmental reasons.


After they begin to brown I sprinkled them with the cinnamon sugar mixture - making sure to turn them so they get coated evenly-ish.

I served them with some homemade bread that had been toasted and we were good to go. I dressed the sweet potatoes with a bit of maple syrup and poof a delicious twist on breakfast potatoes. They turned out better than I had imagined and these will definitely happen again.

Do you have any happy recipes you have stumbled upon? Happy accidents? I would love to try them...

Why the ocean for a recipe? Because we all need a like ocean in our lives - even if we are currently living in the Midwest.

Tuesday, November 15, 2016

Let's talk about dryer balls.

What in the world is a dryer ball and what does one
do with them? 

Why does my dryer need balls?


Dryer balls are pretty much exactly what they sound like and the reason you need them is two fold:
1 - they help your clothes dry faster which helps you save energy - BOOM
2 - they remove the need for fabric softener (except in extreme static situations)

So why are these important?
When you lessen your energy consumption you save money, save the earth, and show the world you can make a difference!
What is wrong with fabric softener? Have you read the ingredients? Can you pronounce all of them? Any of them? So why in the world would you put all that mumbo jumbo on your skin...YOUR SKIN IS YOUR LARGEST ORGAN. Would you eat that crap? No? Well it still gets absorbed into you Through Your Skin!!! Think about that for a while.

Enter the lowly and humble dryer ball. 
You can find these in the As Seen On TV section of your local superstore or on TV during your bouts of insomnia. So you pick up the phone to order...BUT WAIT...there is more. These ugly, nubby, blue balls are made from plastic. YUCK! No bueno!!! Put it down. There is a better way.

Enter the felted wool dryer ball. Made from all natural materials that help suck extra moisture from your clothes and that while bouncing around helping to rid your clothes of static.

Sweet so these bad boys must be crazy complicated to make...right?

Nope. Crazy easy. I will share with you the secrets of the dryer balls.
What materials do you need:
Natural or Virgin Wool
Pantyhose
Yep that's it.
For this project I also used a Merino Wool sweater that I shrunk too small for even my cat - so I cut it up and wrapped it with the Natural Wool. This step is not necessary, but will save on the amount of yarn used.


I started with the sleeves. Buh Bye sleeves.
I rolled that sucker up and started wrapping the yarn around and around and around and around the bit of sweater...


This part reminds me of Dori in Finding Nemo...but instead of swimming I just keep wrapping. Wrapping. Wrapping. And wrapping.  

Annnnnd wrapping...switching direction and trying to keep it somewhat round. The felting process will shrink these suckers up so you want to wrap them to about the size of softballs. 
Once you get the size you want, snip the yarn and tuck it around some of your wrappings or grab a crochet hook and pull it into the center of the ball.

Next you put your balls into pantyhose. STOP. I know what you are thinking. 

Once you have stuffed them all in make sure to separate them because if you don't they will felt together and then you will have an adorable felted caterpillar thing - which might be kinda cute, but not for this project.


You can tie the pantyhose in between the balls or do like I do and use a scrap piece of yarn and tie off the pantyhose between the dryer balls.

Once you have them all in and tied off we are going to put them in the washer in HOT HOT HOT (said in my best Buster Poindexter voice). 
 

You can wash them with other stuff or alone. I sent mine through the washer three (3) times to make sure the felting was tight and wouldn't come undone.

After the washings.
Now all that is left to do is free the balls from their pantyhose prison. Grab your scissors and snip in between the balls and gently peel back the pantyhose. That's it. Now you can toss a few in your dryer and help save the planet.

Monday, November 7, 2016

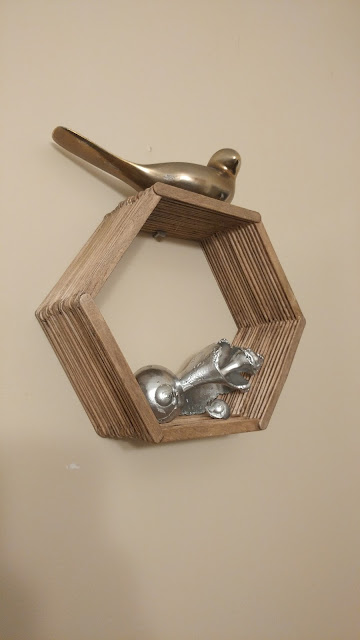
Mid-Century Popsicle Stick + Spray Painted Sea Shells = Amazing Wall Art!


I actually have a thing for the Brady House...


I know I know. I am not ready to rip out the kitchen and go all in with avocado and tangerine, but come on there is something about mid-century that calls to me. You know you have heard it. Don't deny it.

We have a plain wall in our bathroom. It bothers me. We rent, so major renovations are not to be, but we can make it ours. Our bathroom has basic tan colored walls with dark finished wood and dark fixtures. It is nice, but it is kinda boring. I have hung a few pictures to give it some color, but had one wall that needed something.


Thank you Pinterest for providing inspiration. Thank you for having so many popsicle stick crafts. Who knew?

So...what you need:
Popsicle sticks
Glue (I used Gorilla Wood Glue, but hot glue would work or tacky glue, just something sturdy)
Paint or stain if desired
Stuff to put on your awesome creation!

I got my inspiration from Make & Do Crew Thank You!!! Jess got fancy and make a template (visit her awesome page if you would like that lovely resource!). If you know me, you know I am a total winger. Recipes...I scoff at them. Directions? HA!!!!
So why start now?
I made my basic hexagon. 

And then I glued three alternating sticks on each level and kept going and going and going and going level after level after level...My goal was to give it enough depth to hold a tea cup. Why a tea cup? I have been learning the love of succulents. I had a tea cup. I had succulents. They started dating. Got married. Had some chicks. The rest is history.
The chick tea cup...
Around and around we go...until we got to a sufficient depth.


Let the glue dry. Mine dried overnight. So today We Paint!!!! I LOVE PAINTING!!!!


I decided to stain this time. I used some stain I had on hand which was a Minwax Polystain in Tudor. I used a cheap small chip brush I had on hand and had not previously violated and coated this bad boy with one coat of polystain.


It is subtle, but it is there. The night prior to painting I was talking to MA (Mary Alice aka my mom) and we discussed what color I should paint this...we initially came to the conclusion of white with a dusting of gold. Clearly I ignored her motherly advice and stained it, but I did give it a dusting with Rustoleum Gold Metallic spray paint. It is hard to make out, but I promise...it happened.

Here is the horrible wall I needed to fill...


SOOOOOO BORING!!!


The wall with the stained popsicle stick mid-century hexagonal creation.

Now what do I put in it? I tried the succulent filled tea cup, but this is fairly high up on the wall...So unless you are seven feet tall you won't see the adorable chicks. Plan B.

Sea shells. I have a billion of them from going to Duck, NC for about 35 years. I have spray paint. I saw in passing spray painting sea shells. BAM! Thank you Style Blueprint for putting this into my brain! Click here for my inspiration. What could be better? Spray paint? Sea shells? LOVE!!!

The obligatory before.
Enter my love...Rustoleum Silver Metallic Spray Paint. And holy hell I have silver sea shells. That is tough to say!!!!

LOVE!!!

Here it comes all together. Plus a metallic bird I already had. I seriously love it. I need more. Prepare for a trifecta of awesome mid-century inspired hexagons filled with whatever isn't nailed down that I can spray paint. Look out Boo Boo Cat!


I am so happy with how it turned out and you can almost make out the hint of gold spray paint I added...almost.


Tuesday, November 1, 2016

Inspiration comes from all sides including the inside - The Dream Catcher

Looking to the past to create a more peaceful future.

Recently I have found myself confronted by life. Lots of life. Some scary. Some beautiful. Some peaceful. Some like knots tying themselves up inside.
A quick background.
In the past I have suffered from depression and anxiety. It was surprising and terrifying. I was lucky to find the help I needed and a few amazing counselors along the way. But on occasion and generally as the seasons transition from summer in to fall and winter I feel the anxiety come back. For someone that has never experienced it, it is hard to explain. For me it feels like a wind-up toy running at full speed inside my chest. It comes in waves. Like sitting at the ocean watching and you turn your back for a split second and get doused by the water. It catches you off guard and it sets your heart racing.  
What this teaches me.
I am not alone and I am not the only one. 
I seek to find ways to bring natural peace into our house. I am becoming familiar with the use of essential oils and the many ways to use them to help me. Exercise often helps me remove some of my anxiety...running and lifting help me get the good juju flowing. I also try to surround out house with happiness...pictures of our adventures, people we love, art I have created. I have also begun to look to the past. A talisman. An inspiring word or phrase. My arrows that give me a sense of direction.
In times of disruption what can I do to help myself? What can I do to help create the sense of peace I am looking for?
The people native to this land I call home had some ideas about finding peace and creating that peace while you sleep.
There are several versions of the origins of the dream catcher this one come from Dancing to the Eagle Spirit Society and here is a piece of that tradition, 
Natives believed the night air was filled with good and bad dreams. The legend of the Dream Catcher is that it captures the bad Spirits and filters them. Protecting us from evil and letting through only the good dreams.   It is believed that each carefully woven web will catch bad spirit dreams in the web and disappear by perishing with the first light of the morning sun.
The good spirit dreams will find their way to the center and float down the sacred feather.
Dream Catchers are believed to bless the "sleeping ones" with pleasant dreams, good luck, and harmony throughout their lives. It is how many people remember lessons in our community and get their visions.
 It is said that when you get a good night sleep you can remember when the spirit has talked to you. 
The dream catcher is traditionally made from grapevine or willow branches wrapped into what I will loosely call a circular shape.
We have a small grapevine in our backyard that I pruned and used for my first two attempts. 
Attempt one is much larger than the traditional which is the size of an adult hand, but I scaled back on version #2.


The picture on the left was from this summer and the one on the right I took today (November 1, 2016).

I soaked the grapevines in the sink overnight and then wound them into the roundest kinda shape I could make without breaking them.

Here is version number one. I didn't take pictures doing the second one, but followed the same procedure.

Next I started weaving a jute twine around the grapevine with a super simple loop pattern moving in with each turn around the vine.On or about the third go around you add a bead that symbolizes the spider that spun the web.


Here is the vine finished with weaving and the bead.


Next I added a few feather. I got these feathers from my parents neighbor that have quite a wide variety of fowl. At any given moment you can stroll through his yard and collect enough feather to make a mess of dream catchers. I have also started collecting feathers I see in my yard (we have several feeders) and when I am out and about. There is something magical about finding a feather and to me even more amazing when I can identify what bird it came from.
I tied the feathers on from the center of the web and added a few beads for decoration.


I hung the first on Mark's side of the bed and made a second one for me which a hung the next night. The cat tried to help with the feather attachment, but he is not - not helpful.


Here is BooBoo at some ridiculous hour of the morning trying to slay the bird that is on the wall. If you know BooBoo, the only thing he can slay is cat food and cat nip. He was made for domestication. 


Other than the cat I must say I slept well. Thank you dream catcher for helping keep my nights less stressful and my morning (other than the cat) restful.
Plus I am loving the look and adding art to the wall that is other than pictures...
What is next? Who knows...now to go breathe and find my zen.